FullStackOpen前端笔记
使用 React 框架开发简单的前端页面
This is a free course from University of Helsinki.
课程网站:全栈公开课
提交作业:Course stats (commit到自己的repo即可)
Github repo:fullstack-hy2020/fullstack-hy2020.github.io
该课程的 Part0 - Part2 会介绍基本的 前端 开发知识。
Part 0
将 helloworld 打印到控制台。(即浏览器 F12 页面中的 Console)
console.log("helloworld")DOM
Document Object Model ,Web 上最常用的 API 之一。
Event Handlers & Callback Function
Manipulating the document-object from console
HTML 显示的内容、CSS 样式 可以通过在控制台执行 JavaScript 指令来更改。但通常在本地控制台的更改不会上传到云端,所以刷新页面之后更改不会生效。
Part 1
配好环境!
首先,调整好 Linux 开发环境。下面是我在使用 WSL 时遇到的问题:
1. 目录路径混用 Windows 和 Linux 风格
我想让 WSL 成为一个独立的开发环境,而不受 Windows 配置的各种环境的影响。
检查npm的安装路径:
which npm如果不是安装在 Linux 的 \root 等目录下,说明使用了 Windows 的环境。
更改:
# 安装 nvm (Node Version Manager)
curl -o- https://raw.githubusercontent.com/nvm-sh/nvm/v0.40.1/install.sh | bash

# 重新加载配置
source ~/.bashrc

# 安装最新的长期支持版 Node.js
nvm install --lts

# 验证路径(此时应指向 /root/.nvm/...)
which npm
之后,在 part1 目录下,使用 WSL 内部的 npm 重新安装
npm install启动开发服务器
npm run dev2. 在 WSL 的目录中快速进入 Windows 的 VSCode
# 使用 VSCode 打开当前目录
code-insiders .
我的电脑上安装的是 Insider 版本,储存在环境变量的文件名为
code-insiders。如果是 User 版本的 VSCode,直接输入code即可。此外,建议打开 VSCode 的 wsl 窗口模式,以使用 WSL 的环境。
在 WSL 中重新打开文件夹(VSCode的命令):
remote-wsl.reopenFromRecommendationa. React 简介
使用一款叫做 vite 的工具,可以快速创建web应用。
vitejs/vite: Next generation frontend tooling. It's fast!
创建新的 React 应用:
npm create vite@latest启动服务器
npm run devReact 组件 (Component)
component 就是一个js函数,只不过函数名必须大写。比如:```
const Hello = (props) => {
  console.log(props)
  return (
    <div>
      <p>Hello, {props.name}! This greeting is from user-defined functions.</p>
      <br />
    </div>
  )
}
而这样的定义是 非法的:
const footer = () => {
    ...
}
在 App 组件中,footer 并不会作为组件被加载,而是一个普通的 HTML 元素。
箭头函数表达式
一个函数:
function double(x) {
    return 2 * x;
};
可以写成:
const double = (x) => {
    return 2 * x;
}
更紧凑的写法:
x => 2 * xJSX
js的一种语法扩展。文件扩展名为 .jsx。可以让你更方便地编写动态内容,就像直接在js中嵌入html。
props : Passing Data to Components
可以将properties传递给component
一个react组件只会接收一个参数,即一个props对象。
<React.Fragment /> 元素
React组件只允许返回单个元素。如果要返回多个,可以使用 React.Fragment 将他们包裹起来。也可简写成 <>...</>
function Content(props) {
  return (
    <> // React.Fragment
      <p>
        "{props.arr[0].name}" has {props.arr[0].exercises} exercises.
      </p>
      <p>
        "{props.arr[1].name}" has {props.arr[1].exercises} exercises.
      </p>
      <p>
        "{props.arr[2].name}" has {props.arr[2].exercises} exercises.
      </p>
    </>

  );

}
b. JavaScript
对象
c. Component State & Event Handlers
Destructing
解构 - JavaScript | MDN是 JS 的一种语法特性。
一个对象的属性可以这么表示:
props = {
  name: 'Arto Hellas',
  age: 35,
}
需要在组件中调用该对象的属性时,可以这么写:
function showInfo(props) {
    return (
        <div>
        姓名:{props.name} 年龄:{props.age}
        <div/>
    );
}
每次都要写 props 很麻烦。可以解构该对象的属性:
const showInfo = ({name, age}) => {
    return (
        <div>
        姓名:{name} 年龄:{age}
        <div/>
    );
}
这样,我们可以直接将各个属性赋值给函数中的局部变量。
留一个问题:这样写,可以提升性能吗?直接传入props是不是相当于将原对象复制了一份再传入函数中;而使用解构就避免了直接复制对象?能不能省内存?搞清他的底层原理。
State & Hook
在 React 中,组件存储的信息被称为 State。State: A Component's Memory – React
useState 是一种 React Hook。useState – React
const [index, setIndex] = useState(0);index- state variable.setIndex- setter function
只要一个组件内的某个 state 发生变化, React 就会重新渲染一次页面。
注意:不要在非 React 组件内使用 Hook;也不要在循环体和条件判断语句内使用 Hook。
const App = () => {
  // these are ok
  const [age, setAge] = useState(0)
  const [name, setName] = useState('Juha Tauriainen')

  if ( age > 10 ) {
    // this does not work!
    const [foobar, setFoobar] = useState(null)
  }

  for ( let i = 0; i < age; i++ ) {
    // also this is not good
    const [rightWay, setRightWay] = useState(false)
  }

  const notGood = () => {
    // and this is also illegal
    const [x, setX] = useState(-1000)
  }

  return (
    //...
  )
}
An Event Handler is a Function
当我们定义一个按钮:
<button onClick={() => setCounter(counter + 1)}>
  plus
</button>我就在想,onClick= 后面接的为什么不能是一个表达式呢?就像这样:
<button onClick={setCounter(counter + 1)}>
  plus
</button>
这么写 console 会报错:

d. A more complex State
Spread Syntax (...) - 展开语法
Spread syntax (...) - JavaScript | MDN
JS ES6 引入的功能。
当我们定义对象的一个状态 clicks:
const [clicks, setClicks] = useState({
    left: 0,
    right: 0
}
For the immutability of a state from a component in React, we can set it a new state like this:
const handleLeftClick = () => {
    const newClicks = {
        left: props.left + 1,
        right: props.right
    };
    setClicks(newClicks);
};
But what if I want to add some extra properties to the state clicks? Maybe we can add a property called middle:
const [clicks, setClicks] = useState({
    left: 0,
    right: 0,
    middle: 0
});
这样下面的各个函数也要随之修改。为了提高代码的可维护性,可以使用 JS 的展开语法。对于 handleLeftClick() 组件,可以这么写:
const handleLeftClick = () => {
    const newClicks = {
        ...clicks,
        right: props.left + 1
    };
    setClicks(newClicks);
};
这相当于把原来的 clicks 原封不动地复制过来,再进行 props.left + 1 的操作。
请注意:在 React 中,禁止直接改变组件的状态。
props.left++;这样的表达式是非法的。同时,如果需要向状态数组中插入元素,请使用
concat()方法,而不是直接push()到原数组中。concat()的底层是将数组浅拷贝,并返回一个新数组,适用于react组件中的status。
Update of the State is asynchronous
理解不能。
在 React 中,状态的更新是异步进行的。参见官方文档:把一系列 state 更新加入队列 – React 中文文档
- 设置 state 不会更改现有渲染中的变量,但会请求一次新的渲染。
- React 会在事件处理函数执行完成之后处理 state 更新。这被称为批处理。
- 要在一个事件中多次更新某些 state,你可以使用
setNumber(n => n + 1)更新函数。
官方文档解释得已经很详尽,不再赘述。
processQueue.js
export function getFinalState(baseState, queue) {
  let finalState = baseState;

  for (let update of queue) {
    if (typeof update === 'function') {
      // 调用更新函数
      finalState = update(finalState);
    } else {
      // 替换下一个 state
      finalState = update;
    }
  }

  return finalState;
}
Part 2
前端开发需要反复用到 console.log() .此时 Snippets 就很方便:
Snippets in Visual Studio Code
a. Rendering Collections and Modules
Key-attribute
所有用 map 方法生成的元素,都必须有一个 unique 的 key。
Array.prototype.map() 方法根据一定的规则(函数),对 Array 数组进行映射 (Mapping)。
const array1 = [1, 2, 4, 8];
const map1 = array.map((x) => x * 2);
console.log(map1);
输出结果为:
> Array [2, 4, 8, 16]这里,(x) => x*2 就是 map() 方法所使用的的规则。
不建议 使用数组索引作为键。 Index as a key is an anti-pattern | Robin Pokorny
Array.prototype.reduce()
Array.prototype.reduce() - JavaScript | MDN
将 callbackFn 逐个作用于数组的每一个元素上,且上一次的输出会作为下一次的输入。
语法:
reduce(callbackFn)
reduce(callbackFn, initialValue)callbackFn:为数组中每个元素执行的函数。 该函数被调用时涉及的参数(注意参数要按顺序写):accumulator- 上一次调用callbackFn的结果currentValue- 当前元素的值currentIndexarray
initialValue
下面是 reduce() 的一些常见用法:
求和(用了箭头函数的简化形式,总和初始值为 0)
let array = [1, 2, 3, 4];
let sum = array.reduce((total, current) => total + current, 0);
console.log(sum);
b. Forms
讲义上例子的最终效果:

该节习题的最终效果:

Array.prototype.filter()
Array.prototype.filter() - JavaScript | MDN
filter() 方法创建一份 array 的浅拷贝,根据filter过滤后,返回一个新的数组。
c. Getting Data from Server
typicode/json-server: Get a full fake REST API with zero coding in less than 30 seconds (seriously) 我们暂时还没有后端,但又要模拟与后端的交互,可以用 json-server :
使用npm安装:
npm install json-server开启服务器:
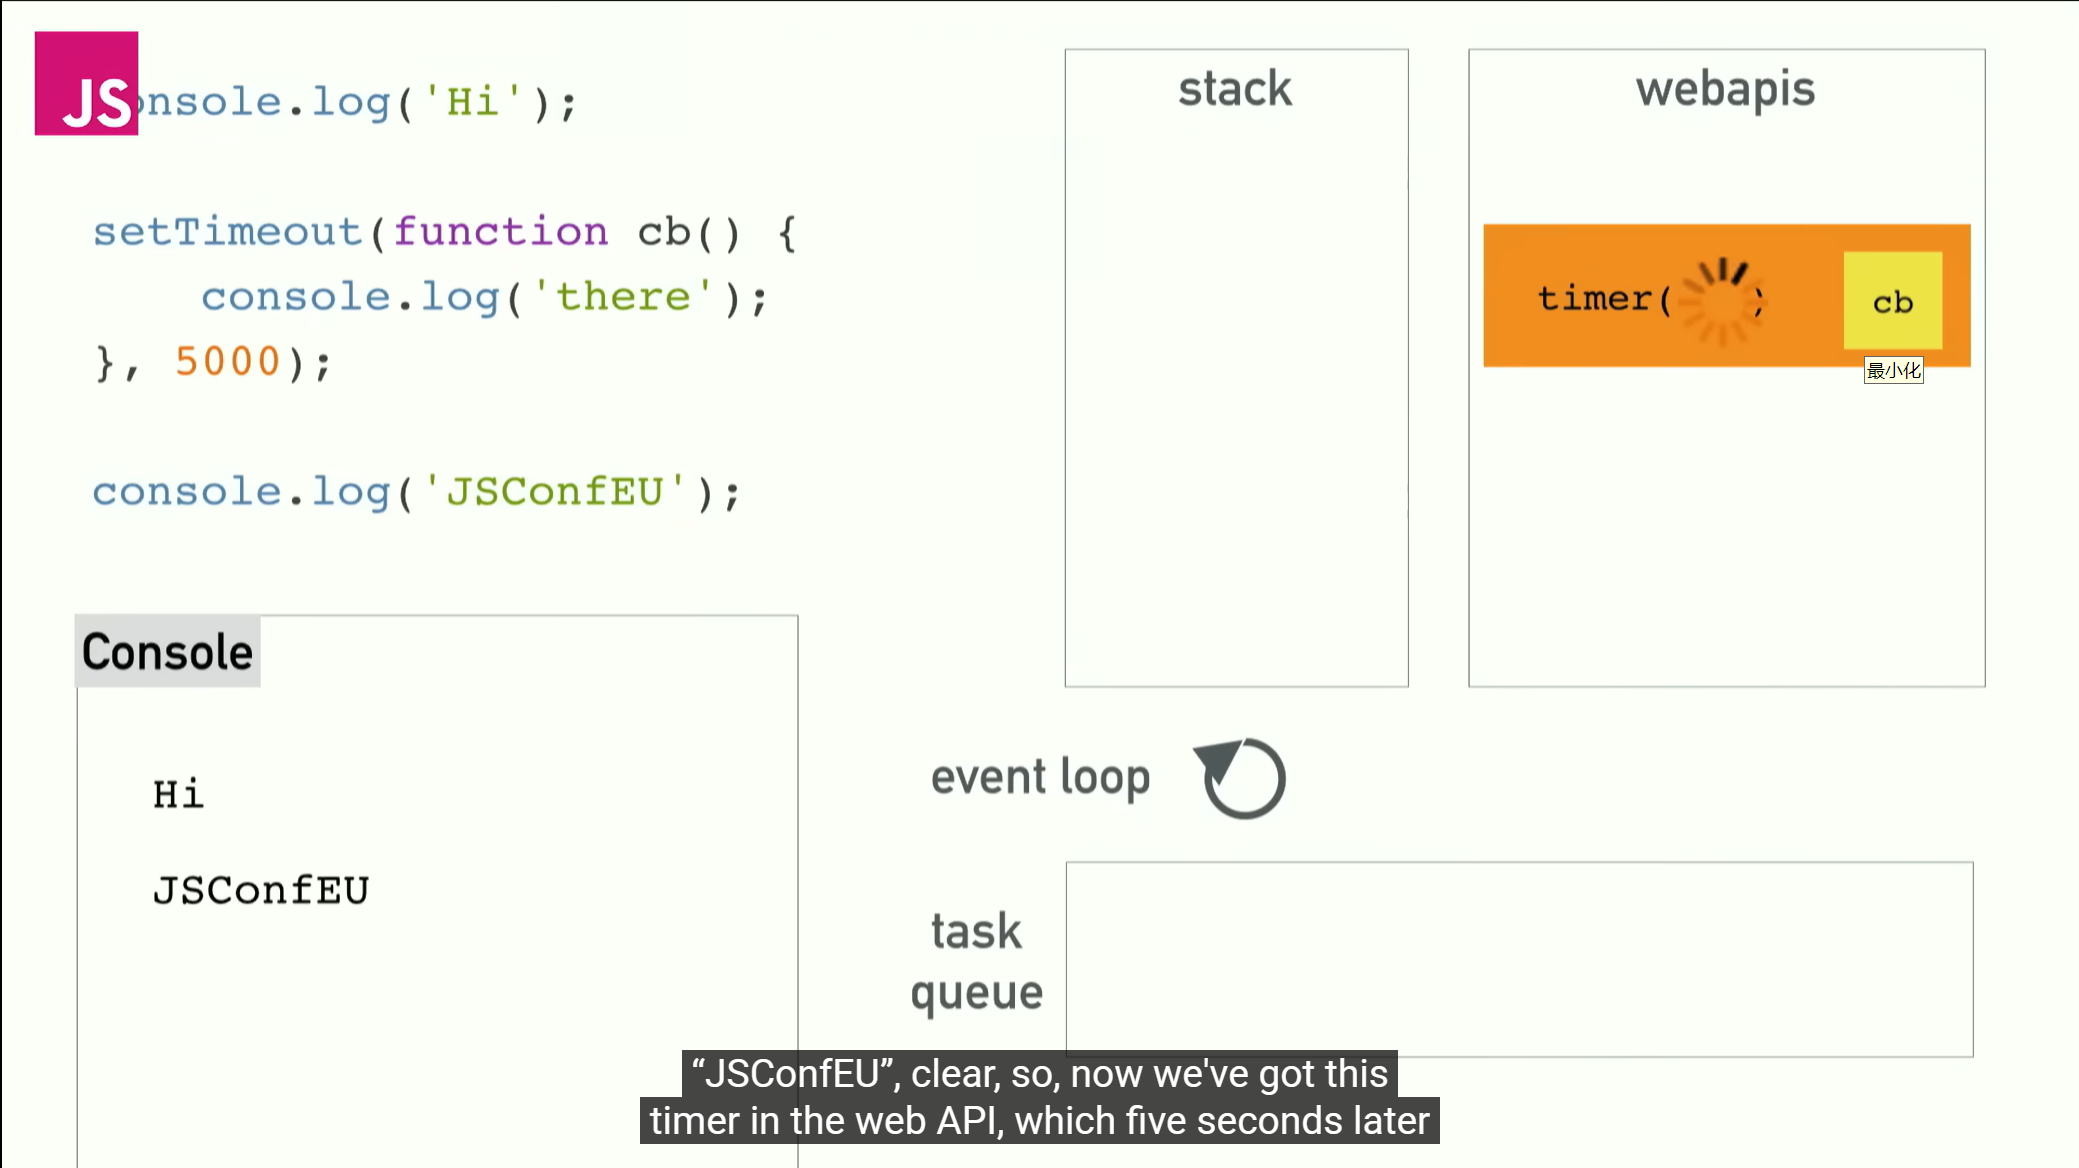
npx json-server --port 3001 db.jsonEvent Loop
事件循环是 JS 处理异步行为的核心机制。
What the heck is the event loop anyway? | Philip Roberts | JSConf EU Philip Roberts 讲得太好了。看完之后,大概了解了 栈、Web API和 Callback Queue 的关系,更能理解js的“单线程非阻塞”特性。
Node Package Manager
如今大部分js项目都是用npm配置的。一般,使用npm构建的项目的根目录有一个 package.json 文件。
axios是一个基于 Promise 的 HTTP 客户端,用于发送网络请求。在项目根目录下运行:
npm install axios将 json-server 安装为开发依赖项("devDependencies")(应用程序本身不需要用到 json-server,所以不用安装为 dependencies):
npm install json-server --save-dev编辑 package.json ,在 scripts 属性中添加:
"scripts" : {
    "dev": "vite",
    "server": "json-server -p 3001 db.json",
    ...
}
这样就可以在本地的 3001 端口启动 json-server:
npm run serverPromise
A promise is an object that represents an asynchronous operation.
Promise 的状态包括:Pending Fulfilled Rejected
使用 Promise - JavaScript | MDN 基本用例 | Axios中文文档 | Axios中文网
axios 的 get 方法返回一个 Promise :
const pormise2 = axios.get("http://blog.huarun.moe/posts")如果用 POST 方法,还可以指定请求体(支持 XML JSON 等多种格式):
const noteObject = {id: '1', content: 'Dont put the shitty code on stack.'};
const promise3 = axios.post('http://localhost:3001/notes', noteObject);
可以将 Promise(“期约”) 理解为 “现在不返回,但将来的某一时刻会返回回调函数的执行结果” 的类,确实挺像“承诺”的。但是,和基于事件循环(Event Loop)的事件不一样,Promise 只能触发一次。
如果要获取 Promise 中的数据,要求 Promise 的状态为已兑现(Fulfilled)。为了更改 Promise 的状态,需要为 Promise 注册一个 Event Handler。可以使用 then()等方法,实现 扁平化 的 链式调用:
import axios from 'axios';

// 这是一个典型的 Promise 链式调用
axios.get('/api/user?name=Gemini')
  .then(response => {
    // 第一个异步操作成功
    console.log('用户信息:', response.data);
    const userId = response.data.id;
    // 返回一个新的 Promise,实现链式传递
    return axios.get(`/api/posts?userId=${userId}`);
  })
  .then(response => {
    // 这里的 response 是第二个请求(获取文章)的结果
    console.log('文章列表:', response.data);
    const firstPostId = response.data[0].id;
    // 继续返回一个新的 Promise
    return axios.get(`/api/comments?postId=${firstPostId}`);
  })
  .then(response => {
    // 这里的 response 是第三个请求(获取评论)的结果
    console.log('第一篇文章的评论:', response.data);
  })
  .catch(error => {
    // 只要链条中任何一个环节出错,都会直接跳到这里
    // 这种机制叫做“错误冒泡 (Error Bubbling)”
    console.error('请求过程中发生错误:', error);
  })
  .finally(() => {
    // 无论前面的promise返回结果如何,finally()中的语句都会被执行
    console.log('整个流程处理完毕');
  });
(generated by AI)
Effect Hook
Effect Hooks – React 中文文档 使用 Effect 进行同步 – React 中文文档
可以用 Effect Hook 从服务端获取数据,参数分别是副作用(作为回调函数)和依赖数组。
useEffect(sideEffects, dependencyArray);When dependencyArray is an empty array ([]) , the call back function will be executed only once after the component finished its rendering.
| Dependency | sideEffects | 备注 |
|---|---|---|
| ( 无 ) | 初始 + 组件更新 | |
[]( 空数组 ) | 初始 | |
[dependency1, denpendency2...] | 初始 + 依赖项更新 | 任何一个 Dependency 发生变化, useEffect() 就会调用回调函数 |
d. Altering Data in Server
REST API
REpresentational State Transfer
2个核心:资源表示性 + 状态传输 6个约束:客户端服务端、统一接口、无状态、缓存、分层系统、按需代码
将后端通信分离为单独的模块
首先,将后端通信的功能分离在 src/services/note.js 中。可以这么写:
import axios from 'axios';
const baseUrl = 'http://localhost:3001/notes';

const getAllNotes = () => {
    return axios.get(baseUrl);
};

const createNewNote = (newObject) => {
    return axios.post(baseUrl, newObject);
};

const updateNotes = (id, newObject) => {
    // 使用 PUT 方法,直接替换整条笔记
    // 基于笔记id的每条笔记资源的唯一url
    return axios.put(`${baseUrl}/${id}`, newObject);
};

export default {
    getAll: getAllNotes,
    create: createNewNote,
    update: updateNotes
};获取note列表(noteService.getAll())、新建note(noteService.create())、更改note状态(noteService.update())这这三个功能可以写成:
import noteService from './services/notes';

// ...

const App = () => {
    useEffect(() => {
        noteService
          .getAll()
          .then(response => {
            console.log('promise fulfilled');
            setNotes(response.data);
          })
      }, []);
        // ...
      };

      // ...

    noteService
      .create(noteObject)
      .then(response => {
        console.log(response);
        // 用浅拷贝的concat方法,将resonse.data的内容放在本地的note,再渲染
        // 注意,不要直接将本地的noteObject添加到note中,而是使用response.data
        // 指不准服务端会出什么错呢,导致新note被渲染到页面上,但json-server实际上没接收到新的note
        setNotes(notes.concat(response.data));
        setNewNote(''); // 重置输入框
      });

      // ...

      noteService
      .update(id, changedNote)
      // 该 PUT 请求的回调函数将notes状态设定为一个新数组
      // 即:遍历note数组,找到指定id,将importance设定为response.data;不是指定id则保持原样
      .then(response => {
        setNotes(notes.map(note => note.id === id ? response.data : note));
      });
}
如此设计,相当于将拆解 HTTP 报文的工作交给了 调用端(App.jsx) 中的代码。但其实将 response 分解成 response.data 的步骤,在 Service 层 完成会更好:
const getAllNotes = () => {
    const request = axios.get(baseUrl);
    return request.then(response => response.data);
};而在调用端(App.jsx)只用这么写:
useEffect(() => {
    noteService
      .getAll()
      .then(initialNotes => {
        setNotes(initialNotes);
      })
}, []);
因为已经在 Service层 返回了 repsonse.data ,所以不需要再调用 响应对象 的 .data() 方法了。
此外,axios中的响应对象还包含了http报文中的其他信息:

Promise.catch()
如果我们用 axios.get() 访问一个不存在的 URL,如何抓取错误呢?
可以用 Promise 的 catch() 方法,该方法会处理 Promise 的 Rejected 状态。
axios
  .get('http://...')
  .then(response => response.data)
  .then(data => {
    // ...
  })
  .catch(error => {
    console.log('fail')
  })
处理一个典型的错误:
e. Adding Styles to React App
在 src 目录下创建 index.css :
h1 {
    color: green;
}
并在 App.jsx 中导入:
import './index.css'这样就应用了一个最基本的样式。
CSS selectors - CSS | MDN - 使用 CSS Selectors 可以规定某个样式应用的范围。
Inline Styles
React 中的内联样式:
{
  color: 'green',
  fontStyle: 'italic' // 驼峰式命名法
}
作业的最终效果
